The Beginners Guide For HubSpot Workflows
Table of Contents
Introduction
Automation is a fantastic thing.
As a professional it's a given that your job will consist of both repetitive tasks and more interesting strategic work - the promise of automation is we can minimise the former so we can enjoy the later.
Historically, automation has been the realm of the engineer or software programmer - thankfully, new platforms are making it increasily viable for motivated persons (like yourself) to accomplish 80% of what a programmer could do with 20% of the effort.
Platforms like Zapier, Make.com, n2n.
Platforms like HubSpot and their offering - HubSpot workflows.
The advantage HubSpot brings over these other platforms is it already has your data - by using HubSpot workflows we can avoid the troublesome task of stitching systems together and focus only on automating the busy work.
And this guide will show you how.
Overview and Philosophy
First things first, philosophy.
Here's the one for you, the automation beginner:
"I build a workflow, to automatically do a repetitive task I would otherwise have to do manually".
Here are some examples:
These are tasks that are perfect for you to automate, and you'll find lots of value in doing so.
To automate a single one of these tasks, you only have to consider three things.
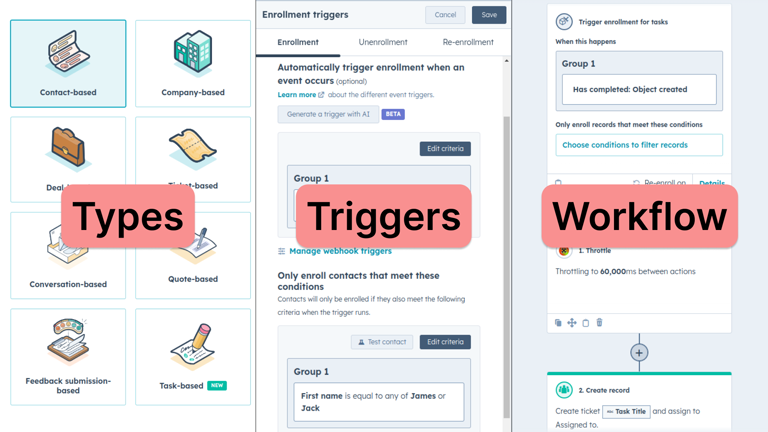
- The type of workflow you're dealing with.
- The trigger of the workflow you're dealing with.
- The effects of the workflow you're dealing with.
Workflow Types and Triggers
Workflows are cause and effect:
- Something happens
- This sets off your workflow
- Your workflow does something in response
The first thing to determine when building a workflow is "What exactly sets off my workflow".
And this can be further be divided into two parts - the workflow type and the workflow trigger.
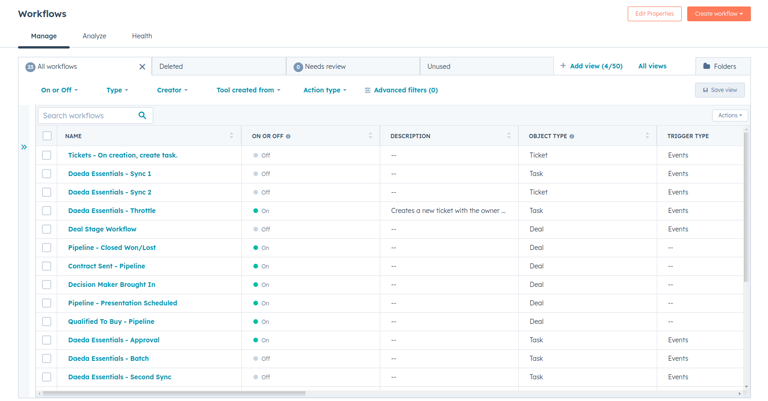
Workflow types are easy, they are broad categories of "What type of HubSpot record changed" - here are the common ones:
Triggers
Triggers are more specific, they define what exactly about this object needs to change before the workflow should trigger.
For example
| Statement | Workflow Type | Workflow Trigger |
| Whenever a helpdesk ticket comes in, I want to create a task to triage it | Ticket | Object Created |
| Whenever a deal moves to a next stage, add a note to that deal owners profile. | Deal | Property Changed (Stage) |
| Whenever a contact goes cold, I want to execute a nurture sequence. | Contact | Property Changed (Last Engagement Date) |
Triggers are important - as a beginner, all your automations will have triggers.
By creating good triggers, you'll minimise mistakes where your workflow is enrolling objects you didn't want it to enroll.
There are four trigger types available:
- When an event occurs (i.e. Do something when your HubSpot updates)
- When filter criteria is met (i.e. Do something to all objects that meet these conditions)
- Based on a schedule (e.g. Do something every monday)
- Webhooks (Advanced, for integrating with systems outside of HubSpot)
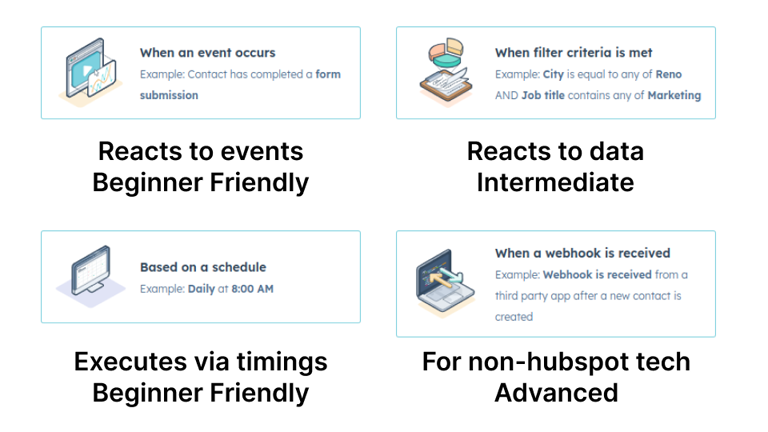
As a beginner, you'll only want to focus on the first trigger type - activating a workflow when an event occurs.
Once you choose this trigger, you'll see three tabs - Enrollment, Unenrollment and Re-enrollment.
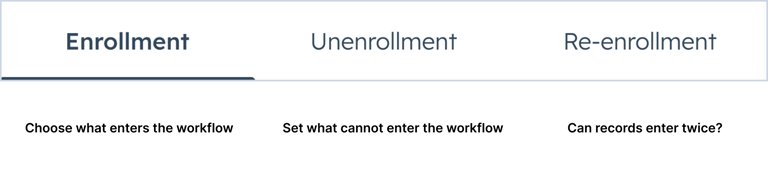
Enrollment is the most important, and the one we'll be focusing on.
Unenrollment is for excluding things - if your triggers are tight and you're only reacting to events you won't need this tab.
Re-enrollment - this option allows you to run objects through the same workflow more than once, as a beginner you also won't need this tab - but take note, it'll quickly become important as your level up.
On enrollment we can see two main features:
- Automatically trigger enrollment when an event occurs
- Contacts meet the following filter criteria
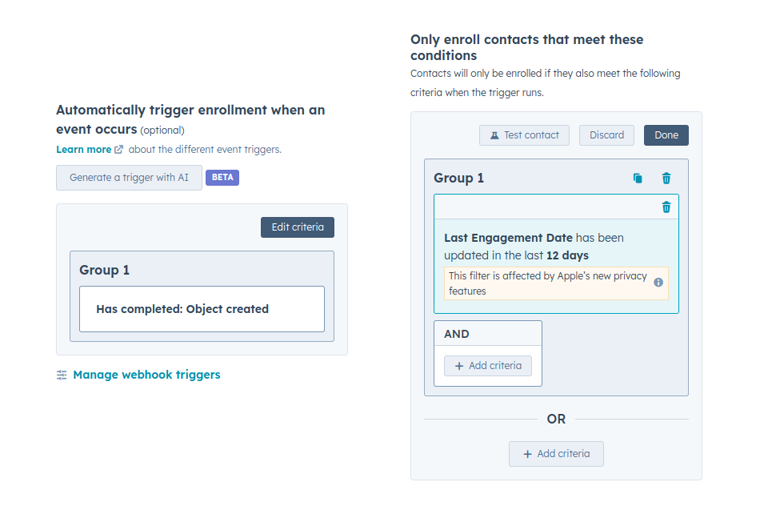
These are how you specify your trigger and they can be confusing at first - afterall, it looks like you can do whatever you want in both of these fields.
For now, my advice is this:
- Be as general as you can be in trigger enrollment.
- Be as specific as you can be in the filter criteria.
Examples:
| Scenario | Type | Trigger | Filter |
| When a ticket is created... | Ticket | Object Created | N/A |
| When a deal is closed | Deal | Property Value Changed > Deal Stage > Is Known | Deal Stage > Is any of > closed Won/Closed Lost |
| When someone clicks a CTA | Contact | CTA click | N/A |
Focusing on filters rather than triggers is the better way to do things
Because:
- Filters have more comparitive options (18 vs 4)
- Filters can be more tightly specified than triggers
- Filters have a testing mechanism, to help you figure out if you've built them correctly
Once your triggers are specified, you're half way done!
Building Workflows
Building workflows isn't hard - in fact most of the workflows you build will probably be one or two extra nodes, and once you're familiar with all the options available you'll be able to piece together workflows in a couple of minutes.
Here are some nodes you should focus on:
- Communications > Send Email
- Communications > Send in-app notification
- Communications > Send internal email notification
- CRM > Create Record
- CRM > Create Task
- CRM > Create Note (BETA)
- CRM > Rotate record to owner
- Marketing > Add to static list
- Marketing > Remove from static list
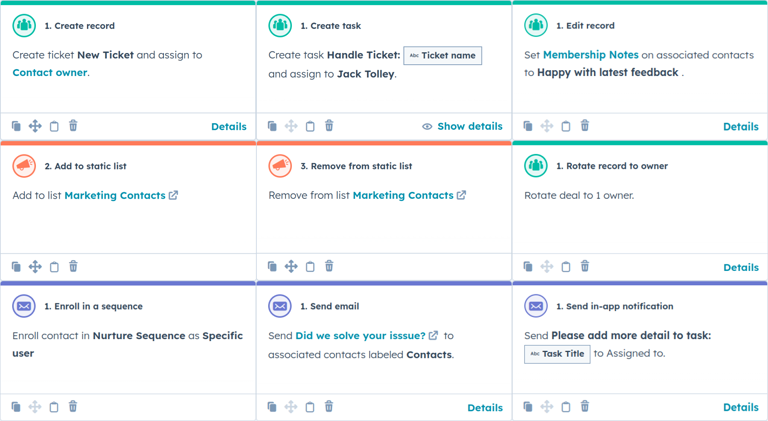
For example, if I want to create a task, I'd use the "Create task" node.
If I want to maintain marketing email lists, I'd be making liberal use of the "Add to static list" and "Remove from static list"nodes.
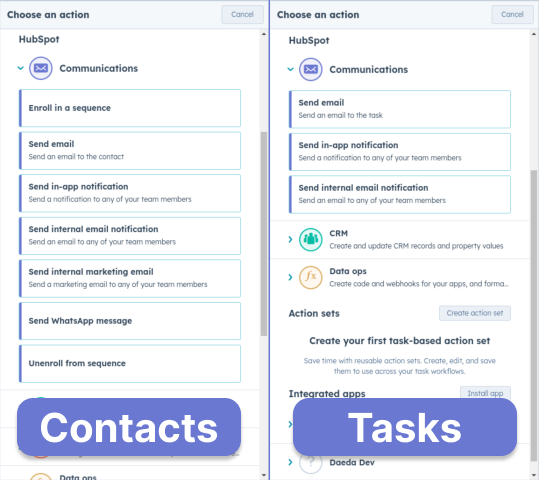
Finally, be aware that different workflow types have different available nodes. For instance, it probably won't surprise you that a "Contact" type workflow has way more communication category nodes that a "Task" workflow does.
Polishing Up
Now that your workflow has been pieced together, it's time to polish it up and get it turned on.
Here, the small details matter - the difference between a un-named, lame workflow and one with all the features I've described could be the difference between months of incorrect data being pumped out and being able to catch bugs before they happen.
- A descriptive name (deceptively important!)
- A descriptive description
- A sane workflow run schedule
- Enabled notifications for errors
- Sane permissions
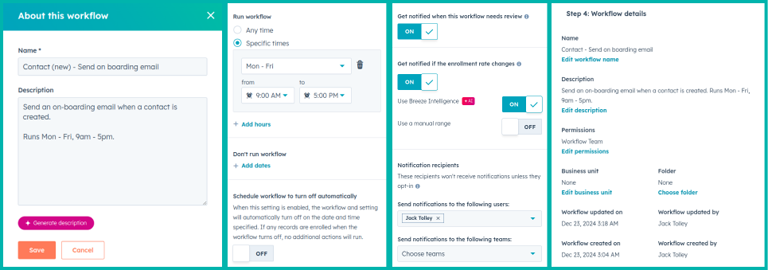
When it comes to descriptive names - you will suffer without a basic naming schema. One I can recommend is "[trigger] - [result]"
- Deal Stage Change - Send Internal Email
- Ticket (New) - Create Task for review
- Contact clicks CTA - Add to warm lead list
For all the other options, you want to set them up to be as cautious as possible - especially when the workflow is fresh.
If possible, I'd recommend you setting the workflow runtime to only occur during the working hours - when you're around to fix things if they go wrong.
You should always enable notifications for workflow errors, to give you visibility when the workflow isn't working.
And if you can, restrict the permissions to yourself and anyone who is well versed in workflows - having someone else change your workflows is an experience that can happen by accident, best avoid it with an extra lock.
With all these set you can now enable your workflow, this means that when the CRM changes and meets the trigger condition - the workflow will automatically execute. Normally within seconds, but sometimes it might take a minute or two.
Testing and Debugging Workflows
Here's a thought, testing and debugging are the same activities - one happens before things go wrong, one happens after.
HubSpot has thankfully added quite a few mechanisms for testing your workflows, so you can be sure they operate in the ways you would expect:
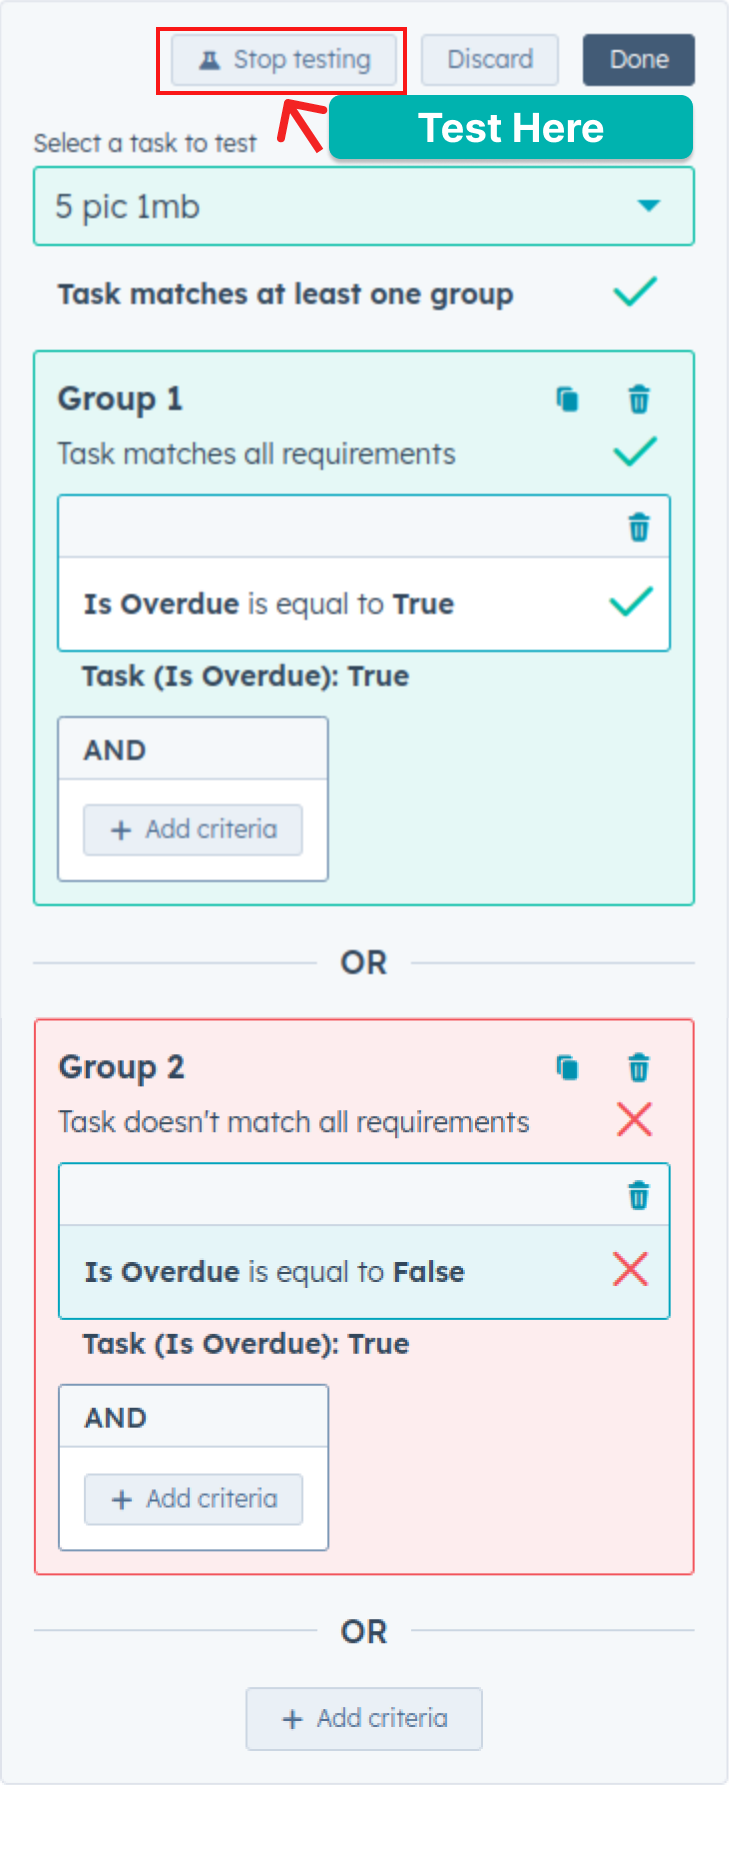
- "Text [object] button - The best way to test your trigger, if you are using filters heavily, this will give you a breakdown of the reasons why a contact wouldn't enroll if it's note behaving as expected.
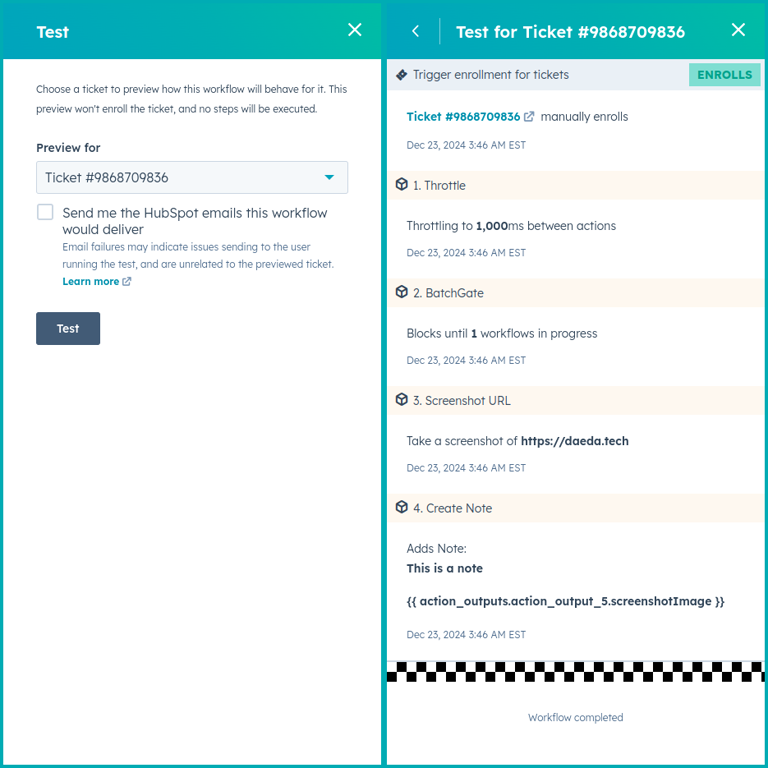
- "Test" - You can get an overview of how your workflow is expected to run and what is expected to happen. This is great for seeing if your logic is sound, but bare in mind it's theorectical.
- Do a dry run - If possible and sensible, do a dry run. Remove the trigger so that the workflow won't activate accidently, then create a dummy object and manually enroll it in the workflow - check out what happens. If all is well, don't forget to re-add the trigger.
- Spin up a sandbox - If the workflow is more complicated, or if you want to be more cautious, spin up a sandboxed account . You'll have to recreate the workflow, but now you can experiment in peace.
Even with the best testing in the world, things can still go wrong - thankfully HubSpot provides options to figure out why and "Debug" your workflows
For instance, Did something not happen?
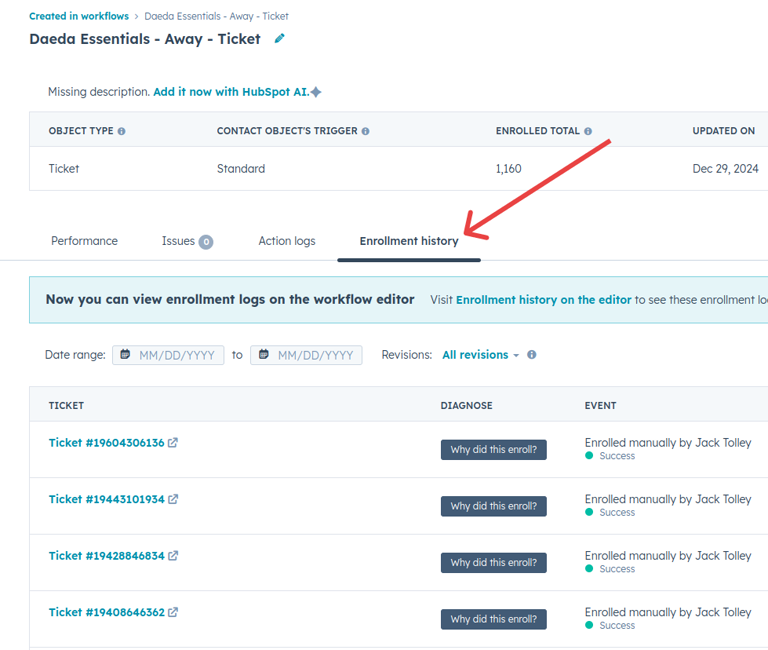
The first place to checkout is the enrollment history. Did the object even enroll in the first place?
If not, there might be a couple of reasons:
- First, it might not have met the enrollment criteria - you can check this out by testing the object to see if it meets the enrollment criteria.
- If the object has already gone through the workflow, and reenrollment is turned off - it won't enroll again.
- You might need to be patient, HubSpot normally executes workflows a few seconds after they're executed - but sometimes it can lag to a couple of minutes.
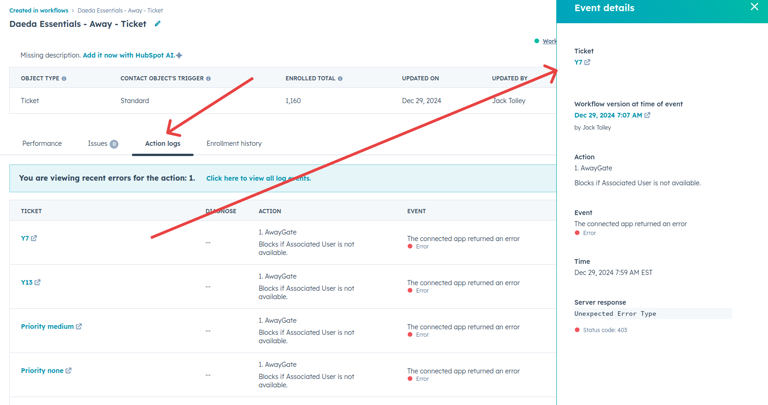
If it did enroll, or if something unexpected happened the thing you need to checkout is the action logs - which can be found in two place.
- Through the enrollment history, this is my favourite place as you can see the workflow side by side.
- Through the settings menu - a little bit hidden away.
The action history will allow you to understand if the underlying system itself is failing.
This includes issues like running into rate limits, custom code failing, third-party applications failing - or things not progressing onwards in the workflow because they've been set up wrong.
Finally, if everything looks good but things are still going wrong, you'll have to get your hands dirty.
Employ the programmers favourite technique for this - the binary search.
- Delete half your workflow, check if this half works as expected.
- If so, add half of the deleted workflow back and check again.
- If not, delete half of the remaining workflow and check again.
Keep repeating this until you zero in on the problem node and fix it.
Fortunetly, as a beginner you won't run into issues that are too complicated, and after a dozen workflows or so I promise you will become extremely confident at putting these automations together.
Third Party Applications
There's one final thing you should know.
HubSpot offers a marketplace of apps that enhances it's entire platform - and that includes workflow automations.
The marketplace can be extremely powerful, allowing you to access complicated or niche capabilities that would be difficult for HubSpot to practically develop
The power of these apps is offset by some downsides though:
- Firstly, most of the good apps cost money in exchange for their services
- The quality will vary - HubSpot garuntees a minimum level of quality for the apps, but there are a lot of things to take notice of behind the scenes (trust me). Because of this, you'll want to throughly test any third party integration before relying on it.
Finally, I also build apps to extend out HubSpot workflows - if you're interested you can find them here
Fin
Thanks for reading the guide, if you have any questions/suggestions - feel free to send them my way through email or LinkedIn .
If you need a professional HubSpot app developer, let me know - I may be able to help you out.